This collection is taken from an album of photographs found in the Swan Hunter shipbuilders collection at Tyne & Wear Archives. The album is from 1918 and documents the U.B. 110 before she was scrapped on the dry docks of Swan Hunter Wigham Richardson Ltd, Wallsend.The twin-screw German submarine U.B. 110 was built by Blohm & Voss, Hamburg.
On July 19, 1918, when attacking a convoy of merchant ships near Hartlepool, she herself was attacked by H.M. Motor-Launch No. 263 and suffered from depth charges. Coming to the surface she was rammed by H.M.S. Garry, a torpedo boat destroyer, and sunk.
In September she was salvaged and placed in the admiralty dock off Jarrow slake. She was then berthed at Swan Hunter’s dry docks department with an order to restore her as a fighting unit.
The Armistice on November 11, 1918 caused work on her to be stopped. She was towed on December 19, 1918 from Wallsend to the Northumberland Dock at Howdon and was subsequently sold as scrap.
The album of photographs, taken by Frank & Sons of South Shields, documents the U.B. 110 in extensive detail. The photographs provide a rare glimpse into the mechanics and atmosphere of the raised German submarine.
 |
| Control room looking aft, starboard side. The manhole to the periscope well and various valve wheels for flooding and blowing are visible. |
 |
| Control room looking aft. Wheels for raising and lowering the periscope are visible. |
 |
| Forward torpedo room. |
 |
| Control room. The gyro compass, steering control shaft, engine telegraphs and voice pipes are visible. |
 |
| Diesel engine room. |
 |
| Forward torpedo room. |
 |
| The four torpedo tubes. |
 |
| Torpedo room looking aft. The beam for lifting torpedoes into place is overhead. |
 |
| Number 5 compartment, starboard side. |
 |
| Electric control room, looking aft to motor room and stern torpedo room. |
 |
| Number 6 compartment with sleeping berths. |
 |
| Crew space. |
 |
| Engine room, looking forward on starboard side. |
 |
| Electric control room, looking forward. |
 |
| Aft torpedo room. |
 |
| Control room looking forward to port. Wheels to control air temperature and pressure are visible. |
 |
| Control room looking forward. Hydroplane gear, depth and fuel gauges are visible. |
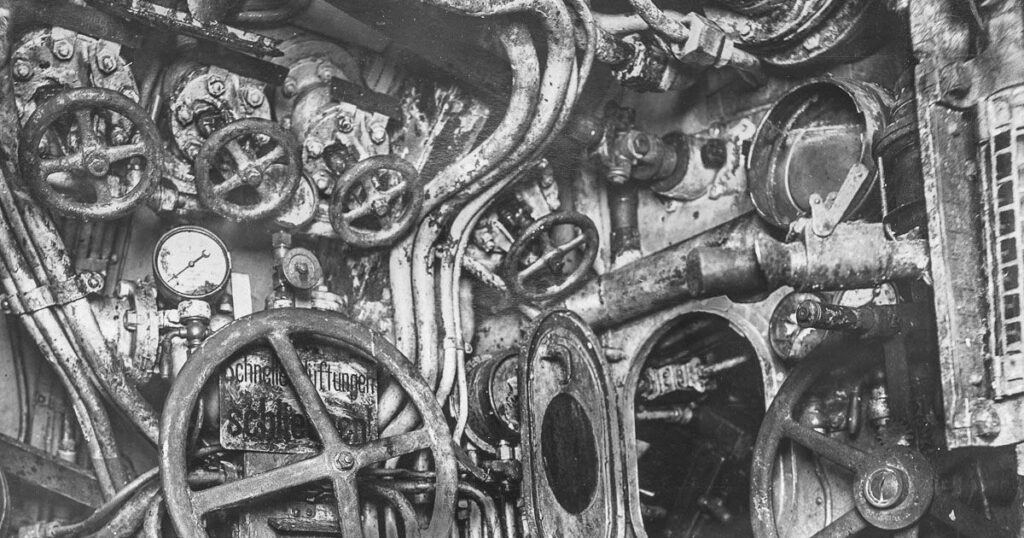
 |
| Control room looking forward. The depth gauge, engine telegraphs, wheels for flooding and blowing, and hydroplane controls are visible. |
 |
| Electric control room. |
 |
| Electric control room, looking aft to port. |
 |
| Third compartment, crew’s lockers. |
 |
| Mess table and lockers. |
 |
| U.B. 110 in dry dock. |
(Images: Tyne & Wear Archives & Museums)